Example XJEase Code
The XJEase library that is installed as part of XJTAG contains XJEase device model files to match thousands of part numbers, meaning that much of your project setup can be accelerated using BOM information to find the right models for your design.
XJEase is an easy-to-learn programming language and from XJDeveloper you can view or edit the device models in your project, to customise them or to create files for new devices.
Below are some examples of some simple XJEase.
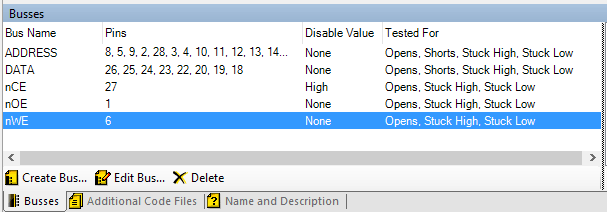
First of all though – in XJEase, the pins on the device being tested are grouped into “busses”. A bus can have one or more pins. This screenshot from XJDeveloper shows the busses for a simple memory device – the ADDRESS and DATA busses have multiple pins (these are simply the pin numbers on the device type being tested, MSB first), and the control pins form single-pin busses – ie the nWE bus consists of pin 6 on the device.
XJEase operates by setting and reading busses, rather than by writing to pin numbers throughout the testing.
The system is “device-centric” – a device model file in XJEase refers to the specific type of device, but it only refers to pins on that device, and not to the circuit that the device is placed in. This means the file can apply to more than one device on a PCB and can be re-used whenever the device is used in another project.
XJEase writes data to or reads it back from the UUT using a “SET” statement.
For example:
SET nOE := 1; drives a bus high (SETting it to 0… sets it low, setting it to I (capital i) turns off drive to the net/bus.
SET val := DATA; is used to read the value of the DATA bus (8 bits of data in the screenshot above) and store it in a variable called ‘val’.
Code Example 1: Driving signals in XJEase
The following is a simple LED test. The code flashes the LED and asks the user to visually check that the LED is flashing. If they press the ‘y’ key on the keyboard the test will pass, any other keyboard input will result in a failure.
The LED has one bus defined, with the name ON_OFF – this is the pin on the LED where setting it high or low will turn it on or off, and this test assumes that the other side of the LED is connected via a current limiting resistor to power or ground.
This code demonstrates driving a signal to the UUT.
GLOBAL Test()(INT result)
  INT state, key;

  result := RESULT_PASS;

  PRINT("Is LED " + UNIQUE_DEVICE_REF + " flashing?");

  DO
    state := !state;
    SET ON_OFF := state;
    SLEEP(200);
    key := GETKEY();
  WHILE key = 0
  END;

  IF key != 'y' THEN
    PRINT("ERROR: LED not functioning correctly\n");
    result := RESULT_FAIL;
  END;
END;
Notes:
- UNIQUE_DEVICE_REF – is simply used to obtain the reference of the device that is currently being tested, so that the same file can be used for all similar LEDs on the board
- DO…WHILE…END construct – this code is a loop – while there is no keyboard input this loop will switch the LED on and off repeatedly. When there is input the loop will end and the IF statement will check whether the input was a ‘y’ or not.
- GETKEY() checks whether any characters have come from the keyboard since the last time around the loop. If not it returns the value ‘0’, otherwise the ASCII value of the key pressed.
- SET statement – this is the line that interacts with the hardware and turns the LED on or off with each loop.
This code could be extended or improved, for example to make sure the LED is left in the ‘off’ state when the test is finished, and the LED tests in the XJEase library are slightly more complex although use a similar structure. However, it shows simple access to the circuit and some flow control operations in XJEase.
Code Example 2: Reading from the UUT with XJEase
This example is a simple test for a pushbutton. The system reads a value from it, asks the user to push it and verifies that the value changes, then tells the user to release the button and checks that the initial value is restored. The user can abort the test by pressing any key on their keyboard.
GLOBAL Test()(INT result)
  INT key, refValue, value;

  result := RESULT_PASS;
  SET refValue := BUTTON_OUT;

  // Flush keyboard buffer
  DO WHILE GETKEY() END;

  PRINT("Press button ");
  PRINT_DEVICE_LINK(UNIQUE_DEVICE_REF);
  PRINT(". Press any key to fail.\n\n");
  ALERT();

  DO
    SET value:= BUTTON_OUT;
    key := GETKEY();
  WHILE (key = 0) && (value = refValue)
  END;

  IF key != 0 THEN
    PRINT_FORMAT(ERROR_STYLE, "\nERROR: Test aborted by operator\n");
    result := RESULT_FAIL;
    RETURN;
  END;

  // Flush keyboard buffer
  DO WHILE GETKEY() END;

  PRINT("Release button " + UNIQUE_DEVICE_REF + ". Press any key to fail.\n\n");
  ALERT();

  DO
    SET value := BUTTON_OUT;
    key := GETKEY();
  WHILE (key = 0) && (value != refValue)
  END;

  IF key != 0 THEN
    PRINT_FORMAT(ERROR_STYLE, "\nERROR: Test aborted by operator\n");
    result := RESULT_FAIL;
    RETURN;
  END;
END;
Notes:
- When the user is asked to press the button, this code uses the PRINT_DEVICE_LINK function to print the reference of the button as a hyperlink instead of plain text – if the person running the test clicks it they will be shown the component in the layout viewer if available in the project.
- The SET statement in this example is the opposite way round to the previous example – this time it reads the digital value of the BUTTON_OUT signal to the variable ‘key’.
- When the test fails, instead of just using PRINT to output an error, PRINT_FORMAT is used. This allows font, size or colour to be varied in the output. In this case the ERROR_STYLE style is one of XJTAG’s standard styles, and prints the error in red text.
- Because the test starts by storing an initial value it will work whichever way the button is used – whether pressing the pushbutton makes the BUTTON_OUT signal go high or low.
Code example 3: Reading and writing together
It is worth noting that you can set more than one bus in a SET statement. A simple memory might have functions implemented to read / write specific addresses which look something like this:
// Write a byte of data to the address specified
WriteCycle( INT address, INT data )()
  SET ADDRESS := address[10..0], DATA := data[7..0], nCS := 0, nWE := 0;
  SET nCS := 1, nWE := 1;
END;

// Read from the address specified and return the byte read in the data parameter
ReadCycle( INT address )( INT data )
  SET ADDRESS := address[10..0], DATA := I, nOE := 0, nCS := 0;
      // This will set the data bits to input.
  SET nCS := 1, nOE := 1, data := DATA;
  FLUSH;
END;
Notes:
- Each SET statement is a single operation – so in the first SET of the WriteCycle function, the ADDRESS, DATA, nCS and nWE busses are all set at once. If the test system is using JTAG they will all be set in the same scan operation.
- Functions – WriteCycle and ReadCycle are functions which can be called from other code to either program or read from specific addresses the memory.
- WriteCycle and ReadCycle both drive values to the UUT to set up the memory. ReadCycle also reads data from the memory – first by setting the DATA bus to I which tells XJTAG to stop driving the net, and then by using the following SET statement to read the DATA bus to the variable called “data”.
- Note that the second SET statement in ReadCycle both drives nets (nCS and nOE) and reads nets (DATA bus) in the same operation. DATA will therefore be read before the changes to the other nets have their effect on the circuit.
- The XJEase language is case-sensitive! The DATA bus and the data variable are not the same thing. XJTAG’s convention is that bus names are upper-case.