Design for Test (DFT) Guidelines
Introduction
The following guidelines provide suggestions for improving the testability of circuits using XJTAG. These guidelines should not be taken as a set of rules. The potential advantages in terms of testability should be considered together with all other implications which they may have (e.g. functionality, device cost and board area).
It is assumed that readers of this document have a minimal familiarity with the IEEE standards 1149.1 and 1149.6.
Throughout this document the term ‘1149.x’ refers to the IEEE 1149.x (JTAG) boundary scan standards, ‘JTAG devices’ means components that implement JTAG boundary scan and are fully compliant with these standards, while ‘non-JTAG devices’ are those that do not implement JTAG boundary scan.
Specify and use JTAG devices
Although XJTAG is capable of testing the nets between JTAG devices and non-JTAG devices, greater coverage will be obtained by using JTAG devices wherever possible. The more JTAG devices that are incorporated into a circuit the greater the number of nodes that can be fully exercised and tested.
The 1149.6 standard allows the testing of capacitively coupled high-speed single ended or differential signals that cannot be tested using 1149.1. In order to use this functionality, it is important to ensure that nets to be tested in this way have 1149.6 capable pin on each side of the coupling capacitor.
Check the BSDL files for JTAG devices
Compliance with the 1149.x standards requires that the device must have a BSDL (Boundary Scan Description Language) file. This file describes the device’s specific implementation of 1149.x. Ensure that this file is available (usually directly from the device manufacturer’s website) and that it has been fully validated (BSDL syntax checking is included as an integral part of XJTAG).
Ensure the 1149.x chains are correctly designed and laid out
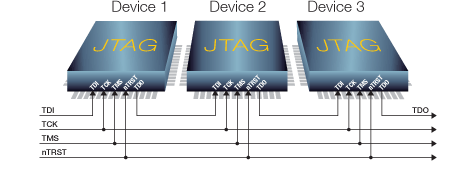
JTAG devices can have individual connectors to provide access to the TAP signals; however, they can also be connected in a ‘daisy chain’ format with the TDO signal from one device connected to the TDI of the next.
The TCK, TMS and (optional) nTRST signals must be connected in parallel to all devices connected in a ‘daisy chain’ format. It is important that nTRST signals are not connected directly to ground as this would completely disable JTAG, not only for an individual device but for the complete scan chain.
If possible, route the TAP signals away from other active signals to reduce noise and improve signal integrity. The serial JTAG interface will typically run with a clock rate of 10 MHz to 30 MHz, and poor layout can induce errors that are very difficult to pinpoint and can require a board re-spin to fix.
Interleaving TAP signals with power or ground can help diagnose problems with non-functioning JTAG chains; a TAP signal shorted to a constant signal is much more easily diagnosed than two TAP pins shorted together.
Use correct termination for all TAP signals
TCK Termination
Terminate the clock line with an RC termination to match the characteristic impedance of the cable and PCB tracks. Values of 68 Ω and 100 pF or 47 pF could typically be used and will adequately match most cables; they should be placed as close as possible to the pin of the last device in each JTAG chain.
Consideration should also be given to the source impedance of the specific XJTAG controller at the output voltage selected. For information on the output characteristics of the XJTAG controller please consult the datasheet for the XJTAG product in use.
At TCK frequencies above 30MHz and at output voltages below 2.5V it may be necessary to use a different termination scheme to achieve best performance.
For these conditions, values of 100 Ω to 150 Ω and 10 pF may be preferable, but it may still be necessary to tune the termination values further to achieve the best performance for all nodes on the TCK net. In some cases replacing the capacitor with a 0 Ω resistor to implement a DC termination could give a better result.
TDO Termination
Source-terminate the TDO line with a small series resistor (typically 22 Ω) on the board near the last device of each JTAG chain. On boards with long TDO to TDI nets between JTAG devices, source-terminate each TDO pin with a 22 Ω resistor.
nTRST and Other Asynchronous Inputs
Noise picked up by the cable on asynchronous signals such as nTRST can cause unexpected behaviour. To avoid this, it is recommended that a small RC low-pass filter be placed on nTRST and any other such signals at the input to the board under test. Values of 10 Ω and 10 nF are recommended, which will not slow the edge of the signal enough to cause problems.
Pull-ups / Pull-downs
The TAP signals should be pulled up or down as follows to ensure that they are kept in the required state when the JTAG interface is not in use. Resistances between 1 kΩ and 10 kΩ are acceptable.
| TDI | pull-up |
| TDO | pull-up (on TDO pin of each JTAG device) |
| TMS | pull-up |
| nTRST | pull-down |
Multiple JTAG Chains
It may be necessary to have some devices directly connected to their own connectors for debug purposes during development or programming. Adding the option to link these connectors into a single chain for manufacturing test maybe beneficial and reduce both BOM (Bill of Materials) and handling costs during production. XJTAG’s XJLink2 controller can connect to up to four JTAG connectors on a board.
Connector design
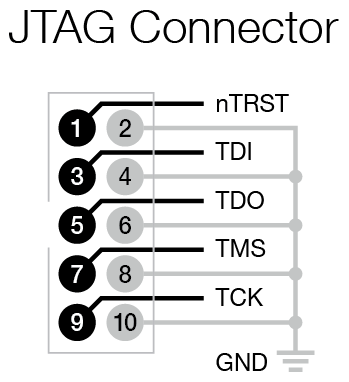
It is particularly important to avoid routing any TDO signal adjacent to TCK. TDO transitions occur on the falling edges of TCK; therefore crosstalk from TDO may cause a glitch on TCK, corrupting the data. If it’s not possible to interleave grounds with every signal, you can route TDI and TMS either side of TDO because they are sampled on the rising edge of TCK, giving time for any interference from TDO to dissipate before TDI and TMS are read half a clock cycle later.
It is very important to have a strong ground connection between the JTAG controller and the board under test. If there are any spare pins on the JTAG connector to the board then adding extra ground signals will be beneficial. The XJLink2 has fixed ground connections on pins 10 and 20 so connecting these will improve signal integrity.
The XJLink-PF40 has a Signal Integrity 10 pinout with hard ground connections on all even pins. Therefore it is possible to pair each signal pin with its own ground pin. This is the optimum arrangement and lends itself to connections using IDC ribbon cable where each signal has its own return path and will be separated from the next by a ground wire. Using twisted pair – rather than flat – ribbon (such as XJTAG-CAB-0028) will give further signal integrity improvements
The XJLink2 has fixed ground connections on pins 10 and 20 so connecting these will improve signal integrity.
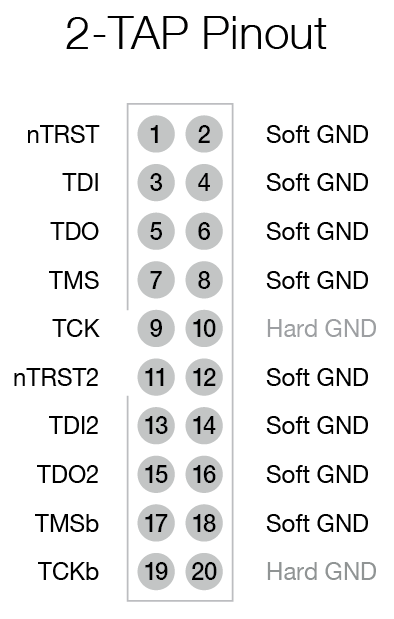
Even for boards with only a single JTAG chain, using Signal Integrity Boards (such as XJTAG-XJA-0030 to XJTAG-XJA-0033) can improve signal integrity by distributing the hard ground on all even pins of interface.
Ideally, each new design will use the same connector type and signal layout so cables can be reused. These connectors should be ‘keyed’ to prevent misalignment.
If the connector can be accidentally fitted in reverse, choose a pin layout that will prevent shorts between power pins and GND (or ‘soft GND’) pins of the TAP controller.
If you are forced to use a connector pinout for your board that doesn’t sufficiently isolate TDO from TCK, you should consider using an adaptor cable so that the signals can be separated before running down any cable that’s more than a few inches long.
JTAG mode select
On some devices, TAP pins can be configured to have functions other than 1149.x boundary scan so it is important to ensure that the design does not prevent devices being used for JTAG testing. The function of these pins is normally configured by sampling other pins on the device as it is reset. Depending on the requirement of the design this configuration can be achieved in several ways:
- If boundary scan is the only function required on the TAP pins the configuration pins can be tied to the required levels.
- If boundary scan is the dominant function for the pins but it is possible that other functions may be required then optional fit resistors allow the configuration pins to be either high or low with a minor board change.
- If there is a requirement to be able to switch easily between functions then the configuration signals can be brought out to a connector. Pull resistors can be used to define the default state which can then be overridden by a controller such as the XJLink2.
The EMU0 and EMU1 pins on a variety of Texas Instruments processors are one common example of such configuration pins while others include the Mode pins on Freescale processors and the JTAGSEL signal on the AT91 family of processors.
The required values for these pins will be defined in the datasheet/reference manual for the device; however they may also be shown in the COMPLIANCE_PATTERNS section of the BSDL file for the device.
Consider the clock to synchronous devices
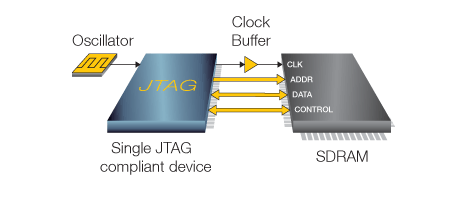
Many synchronous devices can be tested by boundary scan however this will be dependent on the source of the clock. SDRAM, for example, can only be tested if the clock is controlled by an 1149.x compliant device. If a free-running clock were to be connected directly to the SDRAM then it would not be possible to synchronise the boundary scan test vectors to that clock in real time.
If a configurable JTAG device, such as a CPLD or FPGA, is available then route the clock source through that device to the SDRAM or clock buffers to maximize test coverage as shown below.
It is also important to ensure that any clock buffers do not have a minimum operating frequency. Some clock buffers have a special control input to allow low frequency signals. Such signals must be accessible from a JTAG enabled pin.
Other devices, such as Ethernet PHYs and switches, require a specific frequency clock input in order to function. In these cases it is important to make sure the clock is not provided by an 1149.x enabled pin. A crystal or oscillator should be connected to the non-compliant device either directly or via a clock buffer.
While it will not be possible to use boundary scan to interact with the non-compliant device at these speeds; providing a suitable clock will often allow some level of testing that would not otherwise be possible.
Consider watchdog operation
Provide links or 1149.x controllable logic to ensure watchdog operation can be disabled during test. Reset events generated when a watchdog fails to receive a regular input during testing can produce unexpected test result or even prevent tests from completing.
Test with unconfigured FPGAs and CPLDs
Configurable devices such as FPGAs and CPLDs have a high proportion of I/O signals that are ideal for high levels of test coverage. However, when these devices are configured many of these signals do not provide their full I/O capability as the input or output functionality that is not needed in the application is “switched off”. Using boundary scan does not re-enable this functionality, and so test coverage is reduced.
There is an application note on the XJTAG website describing the best strategy for testing boards containing these types of devices.
Ensure low skew between TAP signals
It is important for correct operation that there is low skew between the TAP signals. The track lengths and buffer delays of the TCK and TMS especially should be kept equal wherever possible.
Provide access to help locate scan chain errors
Allowing physical access between the TDO signal of one device and the TDI signal of the next will allow easy identification of which device is causing a problem in the event of a non-functioning scan chain. This can be from a series termination resistor or a test point.
Buffer the TAP signals and voltage level separation
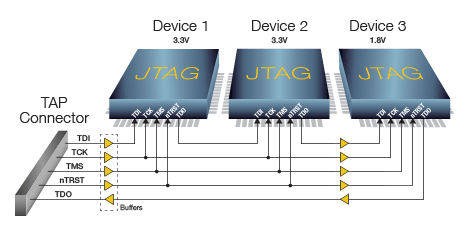
If possible, buffer the primary TAP signals to minimise noise and impedance mismatches and to improve fan-out. Generally, if the track lengths are relatively short then it is acceptable to fan out to 4-6 devices, while longer tracks should only fan out to 1 or 2 devices. Ensure TCK, TDI, TMS and nTRST are buffered at board entry and TDO at board exit. It is important to ensure that the buffers are non-inverting.
If there are JTAG devices that operate at different voltages then it is advisable to separate these into chains of devices that operate at the same voltage level. Alternatively group the devices from the same voltage family together in the daisy-chain e.g. 3.3 V and then connect into the devices of the next voltage through a voltage converter to adjust the signal accordingly e.g. 3.3 V down to 1.8 V.
If it is not possible to buffer TAP signals between voltage domains then design the JTAG chain to allow voltages to be translated down e.g. from 3.3 V signals to 2.5 V (for example using resistor divider) as this is easier than stepping up voltages.
It is important that any buffered signals are terminated as previously described. The TCK input to a buffer needs termination close to the buffer while the outputs from any buffers need parallel termination close to the last device on the trace. Any buffered TDO signals should have series termination close to the driver.
Bypass optionally fitted 1149.x compliant devices
Where JTAG devices are ‘optional fit’ on a board ensure that a link, normally a 0 Ω resistor, is provided to complete the TAP data chain whenever the device is not fitted.
If this is not done then the broken data path in the scan chain will prevent any testing being done using any other devices in that chain. If a device is unlikely to be fitted then consider placing it in a separate scan chain.
Include add-on and option boards in the 1149.x chain
Where daughter boards are used, route the 1149.x chain through devices on the daughter boards via the board connector. If the daughter board is an option, then use some board detect logic to bypass the TAP data path on the daughter board when it is not fitted as shown below.
If designing or specifying ASICs include 1149.x compliance
If your design includes ASICs or any other custom designed silicon, you should consider making the custom devices 1149.x compliant as they are otherwise likely to be untestable.
Make programmable parts accessible from the 1149.x chain
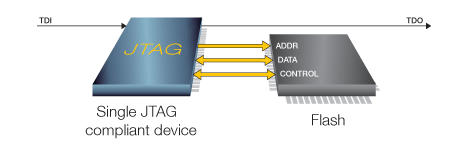
If in-system programming of devices such as flash or EEPROM is required, make all the necessary pins of the programmable devices accessible from JTAG devices.
The boundary scan based in-system programming time will depend on both the length of the scan chain and the TCK frequency. For the shortest boundary scan based programming time the TCK frequency must be as high as possible and the scan chain as short as possible.
It is preferable to make all of the required nodes accessible from a single JTAG device. XJTAG will automatically optimise the programming process by putting all JTAG devices that are not required for a particular scan into a mode called CLAMP which shortens the data path through each device to a single bit.
It is advisable to avoid address latch configurations as they will increase the number of scans required to write each byte/word which will significantly increase the programming time.
Provide direct access to programming signals
Programming times can be further optimised by directly controlling programming signals such as write enable or even whole protocols such as SPI and IIC. By routing the relevant nets to a connector on the board they can be controlled using spare I/O pins on the JTAG controller rather than through boundary scan. This helps reduce programming times as signals that need to be changed frequently, normally requiring two complete scans, can be toggled independently of chain length and frequency.
To use this functionality, it must be possible to disable any boundary scan drivers on these nets.
Surround logic clusters with JTAG devices
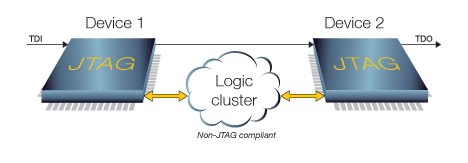
Arrange non-JTAG logic into clusters surrounded by JTAG devices which can control all the inputs and monitor all the outputs to and from the cluster. Try to ensure that sufficient access to nodes within the cluster is available in order to test the operation of the cluster as fully as possible. If necessary, add additional JTAG connections to gain access to the required cluster nodes. Alternatively, it may be beneficial to have the logic system in a programmable logic device which supports boundary scan.
Extend 1149.x testing through connectors
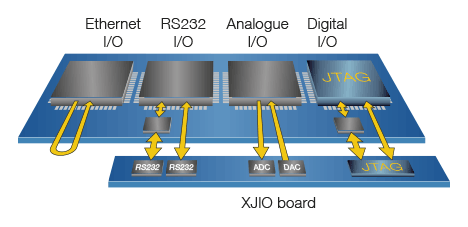
Test coverage is greatly increased if external connectors can be attached to additional 1149.x accessible nets. Testing of connector pins directly attached to nets with a single 1149.x pin can be extended to include open circuit testing if connected to external 1149.x controllable I/O, such as the XJIO board.
This form of testing is only possible for standard digital signals. Where such testing is not possible, for signals such as Ethernet and RS485, design I/O ports so that loopbacks can be used.
Consider testing multi-board panels as one unit
Where multiple boards are constructed on a single panel, consider routing power and TAP signals through some or all of the boards on a panel to enable simultaneous testing of all the boards before separating them.
Test analog circuits
Although 1149.1 and 1149.6 do not include any explicit functionality for testing of analog circuits, many tests can be performed with careful design. Consider connecting using 1149.x compliant outputs to pull comparator or amplifier inputs to fixed states and use the outputs from these devices to provide known inputs to JTAG devices. The addition of low cost DACs and ADCs can provide supplementary controls for, and monitoring of analog clusters by connecting the digital side of the ADC and DAC to devices in the boundary scan chain. With a small amount of appropriate additional circuitry large amounts of analog testing can be performed.
Do not rely on programmable pull resistors
Try not to use the programmable pull-ups which are provided in the I/O pads of some processors and FPGAs to enable external logic to operate. If the pull-ups required on an IIC bus were only provided by programmable pull-ups then any devices attached to the IIC bus may not be testable by boundary scan. If this cannot be avoided then make the IIC bus pins available at an external connector so pull-ups can be added externally for testing purposes.
Consider using the functionality of JTAG devices
There will always be some parts of every circuit that cannot be tested using standard 1149.x techniques, while other parts of the design may require ‘at speed’ testing. In these situations, it may be possible to use programs loaded into devices in the JTAG chain to exercise the functionality of the board.
Configurable devices such as CPLDs and FPGAs can be programmed by running SVF or STAPL files. For processors it may be possible to use the flexibility of XJTAG’s programming language XJEase to load the configuration.
Use test functionality in non-JTAG devices
Some non-JTAG devices have special test features that can be used to increase test coverage. These features, such as NAND tree or test pattern generation, allow testing of nets connected to signals that cannot be tested by using boundary scan to interact with the devices’ functionality. They can be invoked by writing to registers using interfaces such as SPI, IIC and MDIO that can be controlled through boundary scan.
Interactive tests
A number of tests can only be done with the aid of the test operator. Visual devices can be tested by having the operator observe their function and input their results; switches by having a JTAG device monitor the state of the switch whilst being actuated by the operator. Other devices such as stepper motor controllers and speaker systems can also be tested in a similar way.
Program non-volatile memory devices
XJTAG may be used to program many devices such as NOR and NAND flashes with both serial and parallel interfaces. This is useful for loading application images or just storing configuration options, serial numbers, Ethernet MAC addresses etc. as part of the test procedure.
Fast flash programming
In circuit programming of flash devices via boundary scan can be very slow because each net can only be switched once with each JTAG scan and each scan can be several thousand bits long. One solution to this problem is to use either FPGA-assisted or processor-assisted programming routines. These routines first load the FPGA or processor with a programming engine that controls the flash programming. The JTAG port is then used to transfer data to the programming engine.
FPGA assisted programming can be implemented using XJTAG’s XJFlash technologies. As a result, flash devices can be programmed at speeds close to their theoretical maximum. If your design contains a flash device that is not connected to an FPGA but the design does have an FPGA with spare pins, then by connecting up the flash device to these additional pins you can gain the flexibility to use XJFlash.
Processor assisted programming, while slower than XJFlash, is still significantly quicker than using boundary scan. The debug interface provided on many processors use JTAG as their communication protocol. Such processors can be configured through JTAG to use their flash controllers to program an image into the flash.
For more information about implementing fast flash programming please contact support@xjtag.com.
Glossary
| ADC | Analog to Digital Converter |
| ASIC | Application Specific Integrated Circuit |
| BSDL | Boundary Scan Description Language |
| CPLD | Complex Programmable Logic Device |
| DAC | Digital to Analog Converter |
| DFT | Design for Test or Design for Testability |
| EEPROM | Electrically Erasable and Programmable Read Only Memory |
| FPGA | Field Programmable Gate Array |
| IEEE | Institute of Electrical and Electronics Engineers |
| 1149.1 | IEEE Standard 1149.x: 1149.1: Test Access Port and boundary scan architecture 1149.6: AC coupled and differential signals (see www.ieee.org) |
| IIC | Inter-Integrated Circuit (I2C) |
| I/O | Input / Output |
| JTAG | Joint Test Action Group |
| NTRST | Test Reset (Active low TAP Signal) |
| PCB | Printed Circuit Board |
| STAPL | Standard Test And Programming Language |
| SVF | Serial Vector Format |
| TAP | Test Access Port (the 4- or 5-wire interface to a boundary scan device) |
| TCK | Test Clock (TAP Signal) |
| TDI | Test Data Input (TAP signal) |
| TDO | Test Data Output (TAP Signal) |
| TMS | Test Mode Select (TAP Signal) |
| XJTAG | A suite of tools aiding the development and test of electronic systems |
On this page
- Introduction
- Specify and use JTAG devices
- Check the BSDL files for JTAG devices
- Ensure the 1149.x chains are correctly designed and laid out
- Use correct termination for all TAP signals
- Multiple JTAG Chains
- Connector design
- JTAG mode select
- Consider the clock to synchronous devices
- Consider watchdog operation
- Test with unconfigured FPGAs and CPLDs
- Ensure low skew between TAP signals
- Provide access to help locate scan chain errors
- Buffer the TAP signals and voltage level separation
- Bypass optionally fitted 1149.x compliant devices
- Include add-on and option boards in the 1149.x chain
- If designing or specifying ASICs include 1149.x compliance
- Make programmable parts accessible from the 1149.x chain
- Provide direct access to programming signals
- Surround logic clusters with JTAG devices
- Extend 1149.x testing through connectors
- Consider testing multi-board panels as one unit
- Test analog circuits
- Do not rely on programmable pull resistors
- Consider using the functionality of JTAG devices
- Use test functionality in non-JTAG devices
- Interactive tests
- Program non-volatile memory devices
- Fast flash programming
- Glossary


